Vibe Instructions
How to use VIBE
1
Turn it on
2
Scroll to the protocol you want
3
Press play
4
Wear it with a lanyard or place it in your pocket
Please note – The protocols for dogs, cats, horses, giraffes and any other animal are the same as they are for humans.
VIBE Device User Guide: Instructions, Usage, Safety, and Troubleshooting
Usage
Starting out, you should use the VIBE a minimum of 3-4 times a week for 30 days. However, you can use it as often as you like and you can run as may different protocols as you like. We have customers who use it multiple times per day. If your body needs the frequencies it will use them, if not they will simply pass though the body with no effect. You can not overdose, so feel free to use the VIBE as often as you like.
Hydration
For the maximum effectiveness you need to be fully hydrated before a session. This means at least 4 (12 oz.) glasses of water in the preceding 4 hours before you start the therapy.
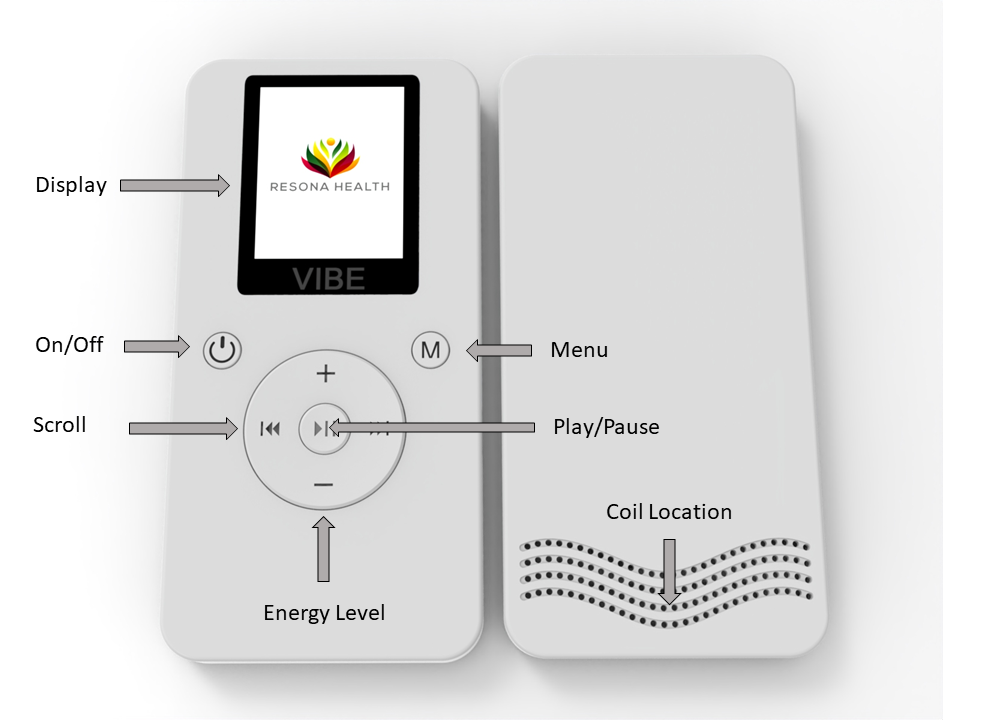
Display
The display screen shows a graphic display of the frequencies, energy level, battery level, protocol, timer, and progress bar while running a protocol.
On/Off
Hold the On/Off button for 3 seconds to activate.
Menu
When you power on the device, the screen defaults to the menu and 1st protocol. Pressing the right arrow will advance alphabetically “forward” through the protocols. The left arrow allows you to scroll backwards to get to the end of the alphabet more quickly.
Once you have selected a protocol, the menu button brings you back to the menu. So the only time you really use the menu button is to get back to the menu if you have already selected or running a protocol, because the device defaults to the menu screen on power up.
Scroll
Scroll forward and backwards through the list of protocols to find the one you wish to run. They are in alphabetical order. Hold it down for fast scroll.
Energy Level
You can select the desired energy output level from 1-10. 10 is the highest level and is the preferred level for maximum therapeutic efficacy. You can change the power level only AFTER you have selected or are running a protocol. You do so by using the + and – on the scroll wheel.
Play/Pause
Play the protocol or pause it at any time.
Coil Location
The coils are located near the back and bottom of the VIBE. The back of the device should be against your body with the screen facing away from the body.
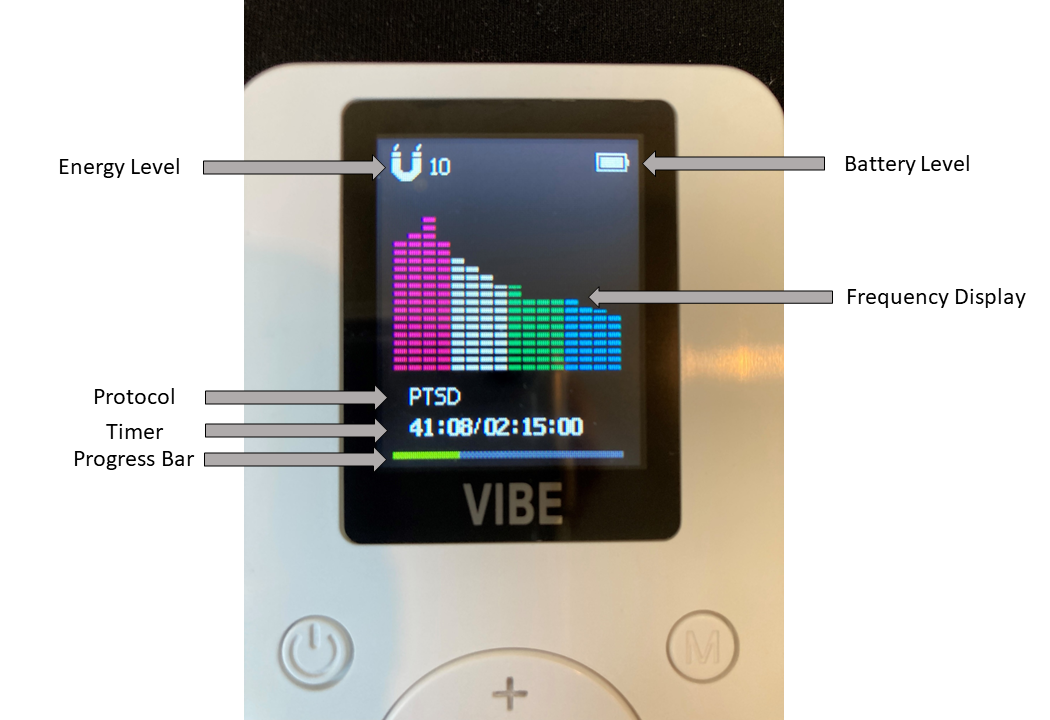
Active Display
While running a protocol, the screen will display the energy level setting, battery status, frequency display, protocol that is running, timer, and progress bar.
The display will go to sleep after 15 seconds to conserve battery power, but the protocol is still running. Press any button to refresh the screen.
If a protocol is NOT running and no buttons are clicked, the device will turn off after 10 minutes of no activity, again to conserve power. For example, 10 minutes after a protocol has finished the device will turn off unless you click something else.
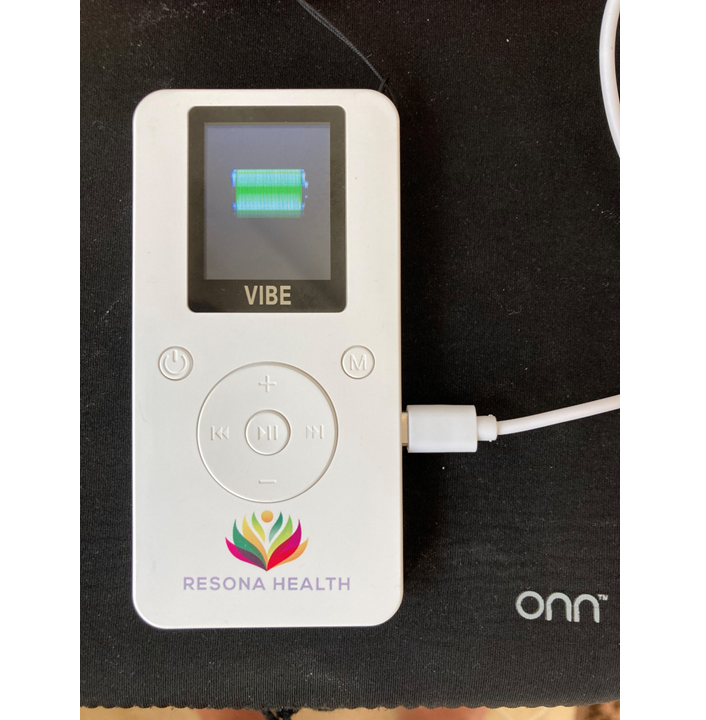
Charging
The VIBE is charged with a USB-C charging cable (included) into a USB hub or by using a USB AC wall adapter (not included). A green battery indicator will flow/fill indicating it is charging. When it is fully charged it will be a solid full green.
Charging time is approximately 2 hours. Battery life is approximately 5 hours at maximum energy level setting.
Wearing the Device
The device should be worn around the neck with the lanyard provided or by placing in your pocket, with the coils side (back of the device) against the body. For pain protocols, the device can be placed closer to the affected area and held in place with an ace bandage, placed at the small of your back while slipped in the waistline, etc. For example, place it in a sock for swollen ankle (General Inflammation), ace bandage on the wrist for arthritis, or attach it to the back of a baseball cap for neck pain.
How to Reboot then VIBE
The VIBE has overvoltage and temperature sensors. They can shut down the device to prevent permanent damage to the unit. This can potentially stop the VIBE from working properly as it goes into safe mode.
The most common causes are faulty USB ports on your computer, damaged AC adapters, and “dirty” electricity in your home or workplace.
Follow these steps to inspect the VIBE and to reboot the VIBE if it not functioning normally.
1 – Closely inspect the VIBE for any visual damage, pay close attention to the case seam as it should be tight and secure. If you find any issues, please send us a video or photographs so we can access the condition and stop using it until we evaluate it.
If the VIBE physically looks undamaged, proceed with the following reboot procedure:
2 – Make sure it is UNPLUGGED.
3 – Depress the power button for a FULL 10 seconds.
4 – Plug it back in. If you have a normal and good power source, you will see the big green battery “filling”
5 – Give it a complete charge before using it again. This is indicated by a solid green battery icon
^ – Resume normal operations with the VIBE.
If the above steps do not result in the return of normal operations, please contact us.
Lanyard Instructions
Please see the videos to the left for the 2 methods to attach the Lanyard. The 1st video is using the Pulsar XO but the slot and method for the VIBE is the same.
Cautions and Warnings
All Resona Health products are low-risk general wellness devices. We do NOT treat, diagnose, prevent, or cure any disease nor do we make ANY claims in this manner.
Any current medications, therapies, or treatments SHOULD NOT be discontinued during the use of any of our products. Consult with your doctor before you make any changes.
The following general contraindications taken from Dr Pawluk apply to Resona Products as well.
PEMF MACHINES RISK AND POTENTIAL DANGERS OF PEMF THERAPY
The only absolute contraindication for use of a PEMF device is placing an active applicator over implanted electrical devices like pacemakers, cochlear implants, intrathecal pumps, etc., because the magnetic field can shut the device off or otherwise interfere with its function.
PEMFs are contraindicated in organ transplant patients. This is because these people are on immune suppression medications to prevent organ rejection. We do not want to risk adversely affecting the immune suppression/rejection process. There is a chance that PEMFs may actually stimulate or activate a more aggressive rejection process by stimulating the immune system.
USING YOUR PEMF MACHINE SAFELY
Safety of PEMFs has not been established in pregnancy, although there is no evidence of harm. Most manufacturers warn against the use of their device during pregnancy.
PEMF Machines Risk does occur in Grave’s disease or in the case of active bleeding. Please exercise caution and your best judgment while using a PEMF device if impacted by one of these conditions.
Extremely high intensity PEMFs should be used with caution or with professional guidance in people with implanted metals, such as joint replacements, dental implants, mechanical heart valves, metal stents, or metal staples in blood vessels. This is not due to risk of injury or harm, but because extremely high intensity PEMFs may stimulate the nerves in the area of the metal, causing sharp pain. High intensity PEMFs may also add to the shear stress of metal clips placed in or near blood vessels.
This video shows how to attach the lanyard with a wire or bread twist tie. The video uses the Pulsar XO, but the technique is the same for the VIBE.
This video shows how to attach the lanyard with a needle.
This video shows how to attach the lanyard with the lanyard tool.
This video shows how to use the Magnetic Field Tester.
Vibe Core Protocols
Acne is a common skin condition that causes pimples. It occurs when hair follicles under the skin become clogged with oil and dead skin cells. Run Time = 0:36
ADHD, or attention deficit hyperactivity disorder, is a neurodevelopmental disorder characterized by inattention, hyperactivity, and impulsivity. Run Time = 1:18
Allergy is a hypersensitivity to a foreign substance, called an allergen. When a person with an allergy is exposed to an allergen, their immune system overreacts, causing symptoms such as sneezing, coughing, hives, and wheezing. Run Time = 0:26
Alzheimer’s disease is a progressive brain disorder that causes memory loss, cognitive decline, and eventually, death. Run Time = 0:30
Anti-aging is a term used to describe a variety of products and treatments that claim to slow down or reverse the aging process. Run Time = 1:00
Anxiety is a feeling of worry, nervousness, or unease. It can be a normal and healthy emotion, but when it becomes excessive or persistent, it can be a sign of a medical disorder. Run Time = 0:30
Arthritis is a group of diseases that affect the joints. It can cause pain, stiffness, swelling, and loss of function in the joints. Run Time = 1:03
Asthma is a chronic condition that causes inflammation of the airways. It can make it difficult to breathe, especially during an asthma attack. Run Time 0:33
Awaken 852 Hz is a frequency that is said to promote spiritual awakening. Run Time = 0:30
Brain Balancing is a type of therapy that uses magnetic waves to help balance the brain. Run Time = 0:41
Brain Fog is a term used to describe a feeling of mental haziness or confusion. It can be caused by a variety of factors, including stress, lack of sleep, and certain medical conditions. Run Time = 0:30
Brain Wave Alpha is a type of brain wave that is associated with a relaxed and focused state. Run Time = 0:30
Brain Wave Beta is a type of brain wave that is associated with alertness and focus. Run Time = 0:30
Brain Wave Delta is a type of brain wave that is associated with deep sleep. Run Time = 0:30
Brain Wave Gamma is a type of brain wave that is associated with high levels of cognitive activity. Run Time = 0:30
Brain Wave Theta is a type of brain wave that is associated with creativity and imagination. Run Time = 0:30
Breast Health is a term used to describe the overall health of the breasts. It includes factors such as breast cancer screening, breast cancer prevention, and breast health education. Run Time = 0:49
Bronchitis is inflammation of the lining of bronchial tubes, which carry air to and from the lungs. Run Time = 39 min
Carpal Tunnel is a condition that causes pain, numbness, and tingling in the hand and wrist. It is caused by compression of the median nerve, which runs through the carpal tunnel. Run Time 1:08
Cold Sores are small, painful blisters that appear on the lips or mouth. They are caused by the herpes simplex virus. Run Time = 2:30
Common Cold is a viral infection that causes symptoms such as runny nose, cough, sore throat, and congestion. Run Time = 1:27
Connect 639 Hz is a frequency that is said to promote connection and empathy. Run Time = 0:30
Constipation is a condition in which bowel movements are infrequent or difficult to pass. Run Time = 0:41
Depression is a common mental illness that causes persistent feelings of sadness, hopelessness, and worthlessness. Run Time = 0:32
DIA stands for Diabiological syndrome. It is a combination of Depression, Insomnia, and Anxiety. Run Time = 1:49
Earth 7.83 Hz is the natural frequency of the Earth. It is said to have a calming and grounding effect on the body. Run Time = 0:30
Earth 14.1 Hz is a frequency that is said to promote healing and regeneration. Run Time = 0:30
Earth 20.3 Hz is a frequency that is said to promote communication and connection. Run Time = 0:30
Express 741 Hz is a frequency that is said to promote creativity and self-expression. Run Time = 0:30
Fibromyalgia is a chronic pain disorder that causes widespread pain and tenderness in the body. Run Time = 2:24
Flu is a contagious respiratory illness that is caused by the influenza virus. It can cause symptoms such as fever, cough, sore throat, runny or stuffy nose, muscle aches, and fatigue. Run Time = 2:19
General Inflammation is a condition in which the body’s tissues become inflamed. This can be caused by a variety of factors, including infection, injury, and certain medical conditions. Run Time = 0:36
Hangover is a group of symptoms that can occur after drinking too much alcohol. Symptoms can include headache, nausea, vomiting, fatigue, and sensitivity to light and sound. Run Time = 1:00
Heart Health is a term used to describe the overall health of the heart. It includes factors such as heart disease prevention, heart disease treatment, and heart health education. Run Time = 0:46
Immune Support is a term used to describe a variety of products and treatments that claim to boost the immune system. Run Time = 0:32
Insulin resistance is a condition in which the body’s cells do not respond normally to the hormone insulin. Insulin is a hormone that helps the body’s cells absorb glucose from the bloodstream. When cells become resistant to insulin, glucose builds up in the bloodstream, leading to high blood sugar levels. Insulin resistance is a major risk factor for type 2 diabetes. Run Time = 0:42
Kidney Support is a protocol that supports general Kidney health. Run Time = 0:26
Liberate 396 Hz is a frequency that is said to promote emotional freedom and release negative emotions such as anger, fear, and guilt. Run Time = 0:30
Liver Support is a term used to describe a variety of products and treatments that claim to improve liver health. Run Time = 0:39
Love 528 Hz is a frequency that is said to promote love, compassion, and forgiveness. Run Time = 0:30
Low Back Pain is a common pain that occurs in the lower back. It can be caused by a variety of factors, including injury, overuse, and certain medical conditions. Run Time = 1:02
Migraine is a type of headache that is often severe and debilitating. It can be accompanied by other symptoms such as nausea, vomiting, and sensitivity to light and sound. Run Time = 1:06
Mono, also known as mononucleosis, is a viral infection that causes fatigue, fever, sore throat, and swollen lymph nodes. Run Time = 0:36
Neck Pain is a common pain that occurs in the neck. It can be caused by a variety of factors, including injury, overuse, and certain medical conditions. Run Time = Run Time = 0:42
PMS, also known as premenstrual syndrome, is a group of symptoms that can occur before a woman’s period. Symptoms can include bloating, breast tenderness, mood swings, and fatigue. Run Time = 2:06
Prostate is age-associated prostate gland enlargement that can cause urination difficulty. Run Time = 44 min
PTSD, also known as post-traumatic stress disorder, is a mental health condition that’s triggered by a terrifying event — either experiencing it or witnessing it. Symptoms may include flashbacks, nightmares and severe anxiety, as well as uncontrollable thoughts about the event. Run Time = 2:15
Relax and Balance is a type of therapy that uses magnetic waves to help relax and balance the body. Run Time = 0:32
Resolve 417 Hz is a frequency that is said to promote problem-solving and decision-making. Run Time = 0:30
Shingles is a viral infection that causes a painful rash. It is caused by the varicella-zoster virus, which is the same virus that causes chickenpox. Run Time = 2:30
Sleep is a natural state of rest in which the body and mind are inactive. It is essential for physical and mental health. Run Time = 0:47
Stop Smoking is a term used to describe a variety of products and treatments that help people quit smoking. Run Time = 2:36
Sun Burn is a type of skin damage that occurs when the skin is exposed to too much ultraviolet (UV) radiation from the sun. Symptoms can include redness, pain, swelling, and blisters. Run Time = 0:34
Tendinitis is an inflammation of the tendons, which are the tissues that attach muscles to bones. It can cause pain, stiffness, and swelling in the affected area. Run Time = 1:26
Tinnitus is a ringing or buzzing noise in one or both ears that may be constant or come and go, often associated with hearing loss. Run Time = 1:46
TMJ, also known as temporomandibular joint disorder, is a condition that affects the temporomandibular joint, which is the joint that connects the jaw to the skull. It can cause pain, clicking, and popping in the jaw. Run Time = 2:11
Weight Loss is a term used to describe a decrease in body weight. It can be achieved through a variety of methods, including diet, exercise, and medication. Run Time = 0:42
White coat syndrome is a condition in which people experience anxiety or nervousness when they see a doctor or go to a medical setting. This anxiety can cause physical symptoms such as a rapid heart rate, sweating, and trembling. Run Time = 0:30
Wound Healing is the process by which the body repairs damaged tissue. It involves a number of steps, including inflammation, cell proliferation, and tissue remodeling. Run Time = 0:49Acne is a common skin condition that causes pimples. It occurs when hair follicles under the skin become clogged with oil and dead skin cells. Run Time = 0:36
Vibe Expansion Protocols
These 5 Brain Wave Expansion Protocols greatly increase the versatility of the VIBE.
| Condition/Symptom/Disease | Frequency/Range | Brain Wave |
| Arrhythmia | 7-8 Hz | Theta |
| Alzheimer’s | 2-8 Hz | Delta/Theta |
| Angina | 2-8 Hz | Delta/Theta |
| Arteriosclerosis | 7-10 Hz | ThetaAlpha |
| Bruises | 10-14 Hz | Alpha/Beta |
| Cervical Vertebra Pain | 15-20 Hz | Beta |
| Chronic blepharitis | 1-2 Hz | Delta |
| Chronic pelvic pain | 5-7 Hz | Theta |
| Circulatory dysfunction | 7-10 Hz | Theta/Alpha |
| Crohn’s Disease | 12-22 Hz | Beta |
| Cystitis | 5-8 Hz | Theta |
| Dental and oral diseases | 30 Hz | Gamma |
| Depression | 3 or 20 Hz | Delta/Beta |
| Diabetes | 12-22 Hz | Beta |
| Dizziness | 10-15 Hz | Alpha/Beta |
| Eczema | 10-15 Hz | Alpha/Beta |
| Erectile Dysfunction | 6 Hz | Theta |
| Fibromyalgia | 18 Hz | Beta |
| Fractures | 10 or 20 Hz | Alpha/Beta |
| Frozen shoulder | 7-8 Hz | Theta |
| Glaucoma, atrophy of the optic nerve | 12-22 Hz | Alpha/Beta |
| Headache | 3 or 6-10 Hz | Delta/Theta |
| Hepatitis | 12-22 Hz | Beta |
| Herniated disc | 16-20 or 30 Hz | Beta/Gamma |
| Hyperactivity | 20 Hz | Beta |
| High blood pressure | 1-5 Hz | Delta/Theta |
| Immune system enhancement | 24 Hz | Beta |
| Joint dislocations and sprains | 10 Hz | Alpha |
| Ligament injuries | 10-15 Hz | Alpha/Beta |
| Low blood pressure | 20-24 Hz | Beta |
| Lumbago | 10 or 20 Hz | Alpha/Beta |
| Lymphatic disorders | 12-22 Hz | Beta |
| Menopause | 5-8 Hz | Theta |
| Menstrual pain | 5-7 Hz | Theta |
| Migraines | 4-10 Hz | Theta/Alpha |
| Multiple Sclerosis | 5, 13 or 20 Hz | Theta/Alpha/Beta |
| Muscles strains | 11-15 Hz | Alpha/Beta |
| Musculoskeletal pain | 10 Hz | Alpha |
| Nerve pain or neuropathy | 6 Hz | Theta |
| Neuralgia Trigemini | 15-20 Hz | Beta |
| Neurodermatitis | 10-15 Hz | Alpha/Beta |
| Nonunion fractures | 10 or 20 Hz | Alpha/Beta |
| Osteoarthritis | 8-12 or 18 Hz | Alpha/Beta |
| Osteonecrosis/osteochondrosis | 10 or 19-20 Hz | Alpha/Beta |
| Osteoporosis | 8-10 or 15-19 Hz | Alpha/Beta |
| Pain from wound healing | 11-15 or 17 Hz | Alpha/Beta |
| Parkinson’s Disease | 20 Hz | Beta |
| Periostitis | 6 Hz | Theta |
| Phantom pain | 16-19 Hz | Beta |
| Poor circulation | 2-6 or 20 Hz | Delta/Theta/Beta |
| Prostatitis | 3-8 Hz | Delta/Theta |
| Psoriasis | 12-22 Hz | Beta |
| Psoriatic arthritis | 12-22 Hz | Beta |
| Psychosomatic Syndrome | 22 Hz | Beta |
| Raynaud’s Syndrome | 15 Hz | Beta |
| Respiratory diseases | 12-22 Hz | Beta |
| Rheumatoid Arthritis | 10 or 20 Hz | Alpha/Beta |
| Sciatica | 16-20 Hz | Beta |
| Skin Allergies, Decubitus, Ulcus Cruris | 10-15 Hz | Alpha/Beta |
| Sleep disorders | 1-5 Hz | Delta/Theta |
| Spinal injuries | 12-22 Hz | Beta |
| Stomach aches | 10 Hz | Alpha/Beta |
| Stress | 3 or 5 Hz | Delta/Theta |
| Stroke | 7-10 or 20 Hz | Theta/Alpha/ Beta |
| Swelling (Edema) | 10 Hz | Alpha |
| Systemic Lupus Erythemasosus (SLE) | 12-22 Hz | Beta |
| Tendinitis | 8 Hz | Alpha |
| Tinnitus | 10 Hz | Alpha |
| Tuberculosis (TB) | 4 Hz | Theta |
| Varicose Veins | 7-10 Hz | Theta/Alpha |
| Wound healing | 1-5 Hz | Delta/Theta |